adapted from my book, Transformations – for more information go to: https://thestorybehindthefaces.com/books/
 Here’s my simplest tiger face, a very basic approach to what is probably the most popular animal face. Just two sponge colors and black. The fotos in this example are from a face painted at an event in 2005. The makeup used is Kryolan Aquacolors, a water-based theatrical makeup, which I prefer for its bright colors and simple application.

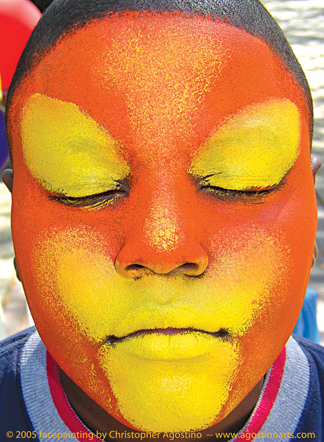
Step 1 – Orange — Start with a sponge and orange cake makeup for the base color. Leave the skin exposed on the eyelids and around the mouth where you will put in the yellow.

Step 2 – Yellow — I use a large, round sponge to apply my cake makeup. By squeezing the working area of the sponge between my thumb and fingers I can control the shape it makes to put the yellow almond shape of a cat’s eye onto the eyelids. By adjusting the size and shape of the eyes you can change the demeanor of the cat: large eyes are cute and kittenish, while narrower eyes can be made sinister. Yellow also goes over and beneath the lips for the whisker areas. When I am working quickly I don’t take a lot of time to blend my colors together, but I can make variations in tone by stippling the yellow over the orange. My sponges have an open texture so if I gently touch them to a face I can quickly stipple on some color to create highlights and a furry texture.

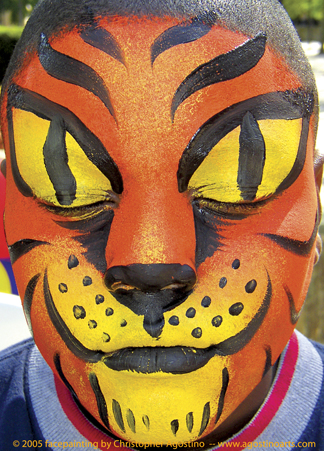
Step 3 – Black — Finally, the black line work. The essential methodology of my fast event faces is strong black line work over brightly colored bases. I’ll use a black liquid makeup loaded onto a #8 round brush when working at my quickest. Eyes first, so they can set a bit while I finish the rest. Iconic cat eyes, with a vertical line for the pupil, also have the advantage that they don’t smear if wet when you open your eyes (like a rounded pupil does). A tiger’s face and nose are longer than ours, so you need to create an illusion to help change the shape of the human face to be more tiger-like. For the nose: paint an upside down black triangle extending below the human nose to make it look longer. Beside the nose, draw a line down from the corner of each eye to the nose you made and shade that line out a bit under the eye with the edge of your brush, to make the human nose seem wider. Add the distinctive line cats have from the nose to the lips. Then paint just the bottom lip black (not the top lip at all) to help complete a visual illusion that makes the whole whisker area jut forward. Support this illusion with the curve of the lines extending out from the sides of the bottom lip, and with “fur” lines on the chin framing the yellow patch. For whiskers I use dots (because I think they read better than little lines which can look like stripes in the wrong place.) Add dynamic black stripes and the tiger is done.
This type of design is the most direct form of mask-like facepainting, in which you directly transform the human features into the animal features, i.e. the human eyes become the tiger’s eyes, the human nose becomes the tiger’s nose, etc. In this simplified style it’s quick to paint, makes a strong colorful impact and looks good from a distance — all of which are desirable qualities in face designs for big crowds at large events.
For examples of how this basic design can generate many variations in a tiger face, see the post “Tiger Variations”