
by Christopher Agostino
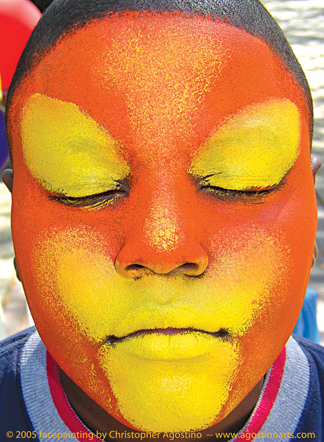
STEP 1 – Basic Tribal Facepainting Transformation
Above are re-creations in black and white on one model of patterns you can find in traditional tribal facepainting. The first four are from Amazon examples depicted in the book Body Decoration by Karl Gröning. The next eight are basic patterns of the Southeast-Nuba of Sudan, Africa, from a set of analytical sketches in the book Nuba Personal Art by James C. Faris. They illustrate what I see as the first step to painting a tribal face: divide the face into areas of color with bars, stripes or strong shapes like triangles.
The quickest way to alter a human face is to put a hard line on it. Human faces have no inherent hard lines or edges, so lines or strong geometric shapes immediately make the face “nonhuman” and ready to become “other”. They disguise the face. They change the shape of the face. They turn the face into a mask. In his analysis of the “underlying raison d’être” for all tribal body painting, Michel Thévoz in “The Painted Body” states: “the skin decoration is functionally designed to dehumanize, depersonalize,…to baffle identification. That is why…it makes play with anti-natural elements such as straight lines, triangles, circles and all rigid geometric figures which stand in conspicuous contrast with the mobility of facial features [and] the organic curves of muscles.”
Notice how these designs effect the appearance of the eyes, how the model’s identity seems to change from design to design. Just as in the approach of any modern makeup artist, the designs center around the wearer’s eyes because our eyes control the perception of our identity. By placing patterns to bring attention to their eyes, you give the wearer control over their new identity. Their eyes turn the design into a living mask.

From a modern facepainter’s perspective, think of all the different things you can turn designs like these into. Whereas the first goal of tribal makeup is to disguise the wearer, or more precisely, to remove his individual human identity, the ultimate goal is to create another identity — to turn them into something new.
 That identity might be a social one, conveying one’s membership within a specific tribe, as in the face of a Kayapo child of the Amazon, or one’s achievement of a certain step within a social hierarchy. In such a case, in conjunction with the “dehumanizing” geometric shapes, symbols or graphic markings might be used that could be read like a written language within the tribe.
Signs, symbols and icons might also be used to expand the human identity to include supernatural or animal elements. Some face art, for example, is designed to turn the wearer into a mythic character like a god, so the wearer can impersonate them in ritual. Some face art allows the wearer to acquire animal attributes and powers, as in this photograph of a Mayoruna woman wearing markings around her mouth and whiskers signifying a powerful animal like the jaguar, in addition to the red shape across her eyes — a color which also symbolically represents power and vitality.
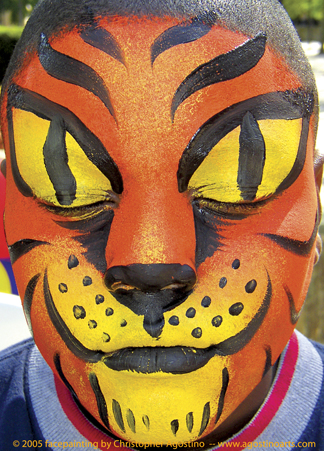
STEP 2- Tribal Approach to an Animal Face
Using colors, symbols, icons and design elements over a basic tribal geometric pattern to “signify” an animal.
Click on this link for a pdf handout of the Teacher’s Guide for this “Totem Animal Mask” design project: TransformationsSchoolProgram_TotemMaskProject_agostinoarts
The anthropological study of masks and tribal art by writer’s such as Franz Boas and Claude Lévi-Strauss explain that in “primitive” art, the aim is not to imitate the appearance of an animal (in the way a photograph does) but rather to SIGNIFY the animal through symbology (in the manner of a visual language). The actual appearance of the animal is subservient to the imagery that signifies it. So to design a tribal animal face (or mask) you need to determine what features or symbols will make the face “mean” that animal — the distinctive signs that make it that animal and no other — rather than trying to draw a picture of the animal. We will use a snake design as an example:
Begin by creating a background that transforms and disguises the face by dividing it into areas of color using horizontal or vertical stripes, and/or strong geometric shapes; choosing the background colors for symbolic content (like red and white for a dangerous snake).
Over that background, add symbols and imagery to signify the animal. Pick a few simple images that make you think of that animal. For a snake it might be fangs, forked tongue, snake eyes, the s-curve of the snake body – in any combination and in any place on the mask. If it is a very poisonous snake, for example, you might choose the fangs as the primary element and you might make them larger than usual, or repeat them in several places on the mask. (Lévi-Strauss points out that it is also important not to put elements on a mask that may confuse it with other animals, so you wouldn’t put feet on a snake mask or fangs on a bird mask).
Finally, add decorative elements or linework to unify the face as a complete design. Boas points out that decoration and aesthetic appeal is as important as interpretation in primitive art, so the final step is to make the design look good. Decoration can be achieved by taking things like the pattern of the snake’s skin (spots, stripes, etc.) and repeating it, or adding additional line work in support of the imagery (like multiple fangs). Overall, keep it simple.
Here are some examples: For these first two examples I created a background with geometric divisions based on the triangle. The first (A) began with a basic Nuba pattern of triangles over the eyes, the second (B) uses the bright coloring of the Papua New Guinea faces, with an “abstract” snake coming down over the eyes. Then I turned them into distinctive snakes by adding a graphic representation of fangs and eyes. For the next three I divided the face with vertical or horizontal stripes to start. Over that I added black line work or simplified imagery to indicate “snake”. One (C) is a sinuous line style loosely inspired by Maori face patterns that is meant to “feel” like a snake. On the other two (D + E) I used simple iconic representations of a snake.


This approach leads to endless creative ways to make face/mask designs – without requiring complex painting or drawing skills, thus it is an effective approach for getting students to move beyond realistic depictions of animals in mask designs. The use of strong colors in an interesting pattern for a background makes almost anything you put on top look good. It presents an experiential understanding of abstract and symbolic art – how to make a work of art that isn’t intended to look realistic.


